

Printing Documents and Understanding Print Options
Introduction
Printing is an important feature of word-processing software. It allows users to produce a paper copy of a document created using a computer. Microsoft Word 2007 provides several printing options that help users print complete documents, selected pages, multiple copies, and documents in different paper sizes.
The Print dialog box provides settings for selecting a printer, choosing the number of copies, specifying the pages to print, and adjusting other printing preferences.
Understanding these options is important for students studying NIOS Class 10 Data Entry Operations because printing is a basic operation performed during document preparation and management.
1. What Is Printing?
Printing is the process of producing a physical copy of a document using a printer.
A printer is an output device that transfers text, images, tables, and other document content onto paper.
For example, when a student creates an assignment in MS Word 2007 and prints it on paper, the student is performing a printing operation.
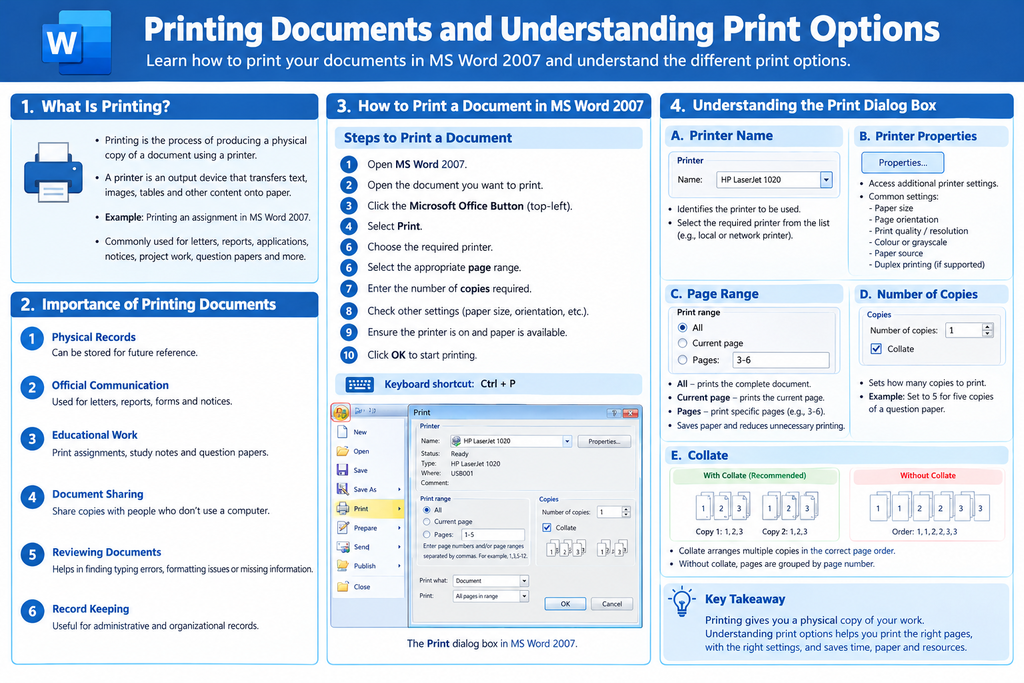
Printing is commonly used for letters, reports, applications, notices, project work, question papers, and other documents.
2. Importance of Printing Documents
Printing is useful for several reasons.
1. Physical Records: Printed documents can be stored as physical records for future reference.
2. Official Communication: Offices and businesses use printed letters, reports, forms, and notices for official purposes.
3. Educational Work: Students and teachers print assignments, study notes, question papers, and learning materials.
4. Document Sharing: Printed copies can be distributed to people who need to read the information without using a computer.
5. Reviewing Documents: A printed document can be reviewed on paper to identify typing errors, formatting problems, or missing information.
6. Record Keeping: Organizations may maintain printed records for administrative purposes, subject to their record-management requirements.
3. How to Print a Document in MS Word 2007
MS Word 2007 provides a Print command that opens the Print dialog box. Users can select the required printing settings before sending the document to the printer.
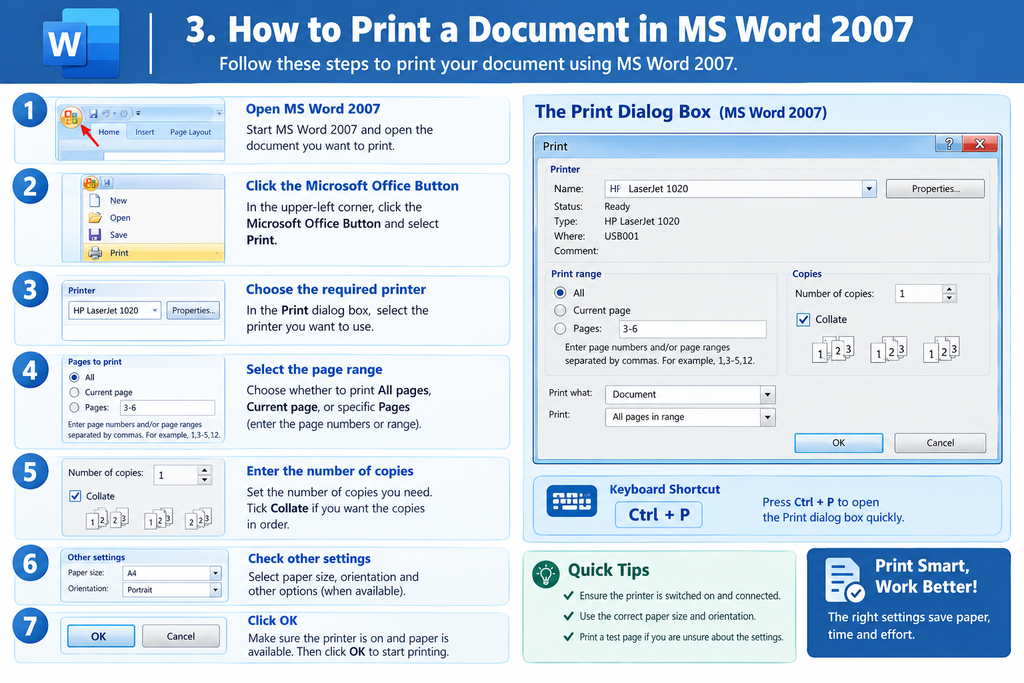
Steps to Print a Document
Follow these steps to print a document:
- Open MS Word 2007.
- Open the document that you want to print.
- Click the Microsoft Office Button in the upper-left corner.
- Select Print.
- Choose the required printer.
- Select the appropriate page range.
- Enter the number of copies required.
- Check other printing settings, such as paper size and orientation, when available.
- Make sure that the printer is switched on and paper is available in the printer tray.
- Click OK to start printing.
The printer will produce the document according to the selected settings.
Keyboard shortcut: Press Ctrl + P to open the Print dialog box in MS Word 2007.
4. Understanding the Print Dialog Box
The Print dialog box contains different options that control how a document is printed.
The main options are explained below.
A. Printer Name
The printer name identifies the printer that will be used to print the document.
If more than one printer is available, the user can select the required printer from the list.
For example, a computer may be connected to a local printer and may also have access to a network printer. The user can choose the appropriate device before printing.
Selecting the correct printer helps ensure that the document is sent to the intended output device.
B. Printer Properties
The Properties button provides access to additional printer settings. The available options depend on the printer and its installed driver.
Common settings may include:
- Paper size
- Page orientation
- Print quality or resolution
- Colour or grayscale printing
- Paper source
- Duplex printing, if supported
For example, a user may select A4 paper and portrait orientation before printing a school assignment.
These settings help users adjust printing according to the requirements of the document and the capabilities of the printer.
C. Page Range
The Page Range option allows users to specify which parts of a document should be printed.
MS Word 2007 provides options for printing the entire document, the current page, or selected pages.
All: Prints the complete document.
Current Page: Prints the page on which the insertion point is currently located.
Pages: Prints the specific pages entered by the user.
For example, if a document contains 20 pages but only pages 3 to 6 are required, the user can enter the required page range rather than printing the entire document.
This option saves paper and reduces unnecessary printing.
D. Number of Copies
The Number of Copies option determines how many copies of the document should be printed.
For example, if a teacher needs five copies of a question paper, the number of copies can be set to 5.
The printer will attempt to produce the requested number of copies, depending on the available paper, printer status, and other conditions.
E. Collate
The Collate option determines how multiple copies of a multi-page document are arranged.
Suppose a document contains three pages and the user needs two copies.
With collating enabled, the pages are printed in the following order:
Copy 1: Page 1, Page 2, Page 3.
Copy 2: Page 1, Page 2, Page 3.
When collating is disabled, the pages may be grouped by page number:
Page 1, Page 1, Page 2, Page 2, Page 3, Page 3.
Collating is useful when printing multiple copies of reports, booklets, assignments, and examination papers.
F. Print What
The Print What option provides choices for determining the type of content to print. Available choices depend on the document and the software settings.
For ordinary document printing, the main requirement is generally to select the document itself.
Other available choices may relate to document properties or additional content, depending on the printing configuration.
G. Pages Per Sheet
The Pages Per Sheet option allows users to print multiple document pages on a single sheet of paper.
For example, selecting two pages per sheet places two reduced-size document pages on one physical sheet.
This option is useful when printing study notes, handouts, or draft documents because it can reduce paper consumption.
However, printing too many pages on one sheet may make the text difficult to read.
H. Scale to Paper Size
The Scale to Paper Size option allows a document to be adjusted to fit a selected paper size during printing.
For example, a document prepared for one paper size can be scaled to fit another supported paper size.
This feature helps users print documents on different paper sizes without manually redesigning the entire document.
The final result may differ slightly from the original layout because the printed content can be reduced or enlarged to fit the selected paper size.
5. Printing a Document on a Different Paper Size
Sometimes, a document is prepared using one paper size but needs to be printed on another.
MS Word 2007 provides a scaling option in the Print dialog box to help fit the document to a different paper size.
Steps to Print on a Different Paper Size
- Open the document in MS Word 2007.
- Click the Microsoft Office Button.
- Select Print.
- The Print dialog box will appear.
- Locate the Zoom section.
- Select the required paper size from the Scale to paper size option.
- Check the other printing settings.
- Click OK to print the document.
The document will be scaled according to the selected paper size, subject to the printer’s capabilities and settings.
Advantages of Changing Paper Size
Changing the paper size can be useful when the required paper is different from the size originally used to prepare the document.
It may also help users fit documents to available paper while retaining much of the original layout.
However, users should check the print preview and final output to ensure that the text and other contents remain readable.
6. Printing Multiple Pages on a Single Sheet of Paper
MS Word 2007 provides an option to print more than one document page on a single sheet of paper.
This feature is especially useful when a document contains many pages and a compact printed copy is required.
Steps to Print Multiple Pages on One Sheet
Follow these steps:
- Open the document that you want to print.
- Click the Microsoft Office Button.
- Select Print.
- In the Print dialog box, locate the Zoom section.
- Select the required number of pages from the Pages per sheet option.
- Check the other printing settings, such as printer name and number of copies.
- Click OK to start printing.
The selected number of document pages will be arranged on each sheet according to the chosen setting.
Advantages of Printing Multiple Pages on One Sheet
Paper Saving: Fewer sheets may be required to print the same document.
Reduced Printing Costs: Using less paper can lower printing expenses.
Compact Notes: Several pages of study notes can be arranged on fewer sheets.
Draft Review: Smaller page layouts can be useful for reviewing the overall content of a document.
However, users should select a suitable number of pages per sheet so that the printed content remains readable.
7. Printing a Draft Copy
A draft copy is a preliminary printout used for checking a document before producing its final version.
MS Word 2007 includes printing options that can help produce draft copies more quickly. The NIOS lesson describes draft printing that omits graphics to allow faster printing.
Draft printing can be useful when users want to review text, correct mistakes, or check the general arrangement of a document before final printing.
Advantages of Draft Printing
- It helps users check the document before final printing.
- It may reduce printing time when graphics are omitted.
- It helps identify errors in the written content.
- It can reduce unnecessary use of printing resources during document review.
The exact effect on printing speed and quality depends on the printer and its settings.
8. Print Preview
Print Preview allows users to inspect how a document is expected to appear when printed.
It helps users check page layout, margins, page breaks, alignment, and the general arrangement of text and images before printing.
In MS Word 2007, the Print Preview command is available through the Microsoft Office Button and the Print options.
Uses of Print Preview
Checking Page Layout: Users can examine whether the document content fits properly on each page.
Checking Margins: Print Preview helps identify text that appears too close to the page edges.
Checking Page Breaks: Users can inspect where one printed page ends and the next begins.
Checking Images and Tables: Users can verify the position of inserted pictures, tables, and other objects.
Reducing Printing Errors: Reviewing the document before printing can prevent wasted paper and ink.
The keyboard shortcut Ctrl + F2 opens Print Preview in MS Word 2007.
9. Important Precautions Before Printing
Users should check a document carefully before printing it.
The following precautions are useful:
- Check the Content: Review the text for spelling mistakes, missing information, and incorrect details.
- Check the Page Layout: Confirm that margins, page orientation, and paper size are suitable.
- Select the Correct Printer: Make sure that the intended printer is selected.
- Check the Page Range: Confirm that the required pages are selected.
- Set the Number of Copies: Enter the correct number of copies to avoid unnecessary printing.
- Check Paper Availability: Make sure the printer has sufficient paper.
- Review Print Preview: Inspect the document before printing whenever possible.
- Check Printer Status: Ensure that the printer is ready and has no unresolved errors.
- Choose Suitable Print Quality: Select a print-quality setting appropriate for the document.
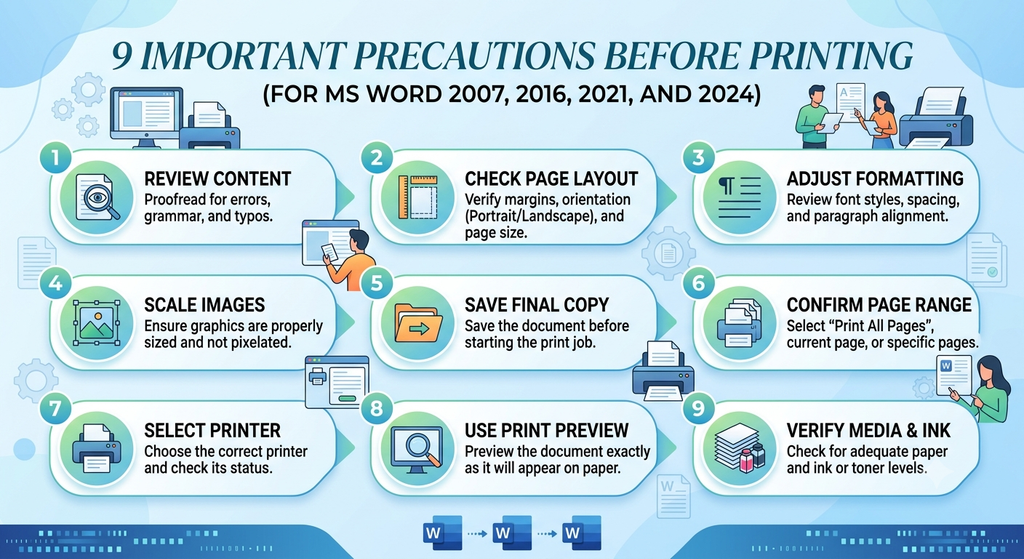
Following these precautions helps produce accurate and readable printed documents.
10. Importance of Printing in Data Entry Operations
Printing is an important skill for data entry operators because their work may involve preparing and producing paper copies of records, reports, letters, forms, and other documents.
A data entry operator must know how to select the correct printer, choose the required pages, set the number of copies, adjust paper settings, and check the document before printing.
These skills help prevent printing mistakes, reduce waste, and improve the quality of office work.
Understanding printing options is also useful in educational institutions, businesses, government offices, and other organizations where printed documents are regularly required.
Conclusion
Printing is an essential feature of MS Word 2007 that allows users to produce paper copies of their documents. The Print dialog box provides options for selecting a printer, choosing a page range, setting the number of copies, selecting paper size, and adjusting other printing preferences.
MS Word 2007 also provides features for printing on different paper sizes, printing multiple pages on one sheet, producing draft copies, and previewing a document before printing.
Learning these options helps students prepare accurate, readable, and professional printed documents. These skills are useful in education, business, office administration, and Data Entry Operations.
Reference: NIOS, Class 10 Data Entry Operations (229), Lesson 3 — Basics of Word Processing, Section 3.8: Printing Documents.


